Use the most current version of QuickBooks that is installed on your computer to avoid an XML error.
If you just installed a new version of QuickBooks, but are still using the older version, you may get an XML error (see below) when making the connection between Treasury Software and QuickBooks.
To resolve the issue:
Please use the most current version of QuickBooks that is installed on your computer.
Possible workaround:
Start the most current version of QuickBooks and update it (Help > Update QuickBooks).
Then try connecting Treasury Software using the older version of QuickBooks.
Note: While this may resolve the issue, it is not a guaranteed fix as there may still be a mismatch between the XML versions.
Technical Section
If you receive an Error Message that says
"QuickBooks found an error when parsing the provided XML text stream",
What caused this?
If you installed a later (more current) version of QuickBooks to your computer - but are still using the older version.
How to fix
Simply use the later (more current) version of QuickBooks with our software.
Possible work-around
Enter into the later (more current) version of QuickBooks and update QuickBooks, Help > Update QuickBooks Desktop > Update Now.
All users - stop here.
If the issue still persists:
If the issue persists - and there is an even later version of QuickBooks available, please install and use that version.
Workaround (not a fix), to manually create a file if the issue persists.
1. Install an Upgrade of QuickBooks Desktop software
If you are using 2018 QuickBooks, for instance, and can install a more recent version of QuickBooks--2020 or 2021--you can run the QuickBooks Updates on the more recent version installed, reboot, and then--without actually upgrading the QBW file-- it should correct the issues using your 2018 QuickBooks.
If this does not work, Intuit recommends installing an upgraded, 2021 version of QuickBooks, and when opening the company file in 2021, the integration should work.
2. Try installing QuickBooks and Treasury Software on a new computer (without any other integrated applications); OR
3. Run a customized report from your QuickBooks company file and export the data to an Excel file. Then, import that Excel file to ACH Universal.
The way to do this:
In QuickBooks, go to Reports->Lists->Employee Contact List
[or Vendor Contact List, or Customer Contact List]
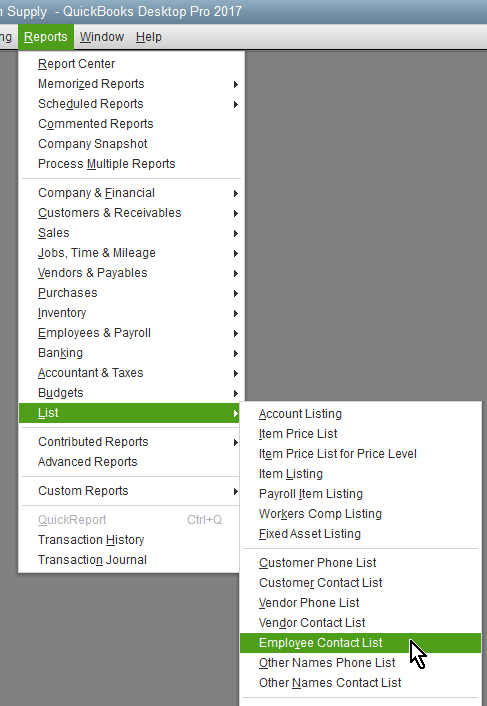
Click on the top left button to 'Customize Report'
Then add check marks next to the fields Bank Account Number, ABA Routing Number, and CHK/SAV to include those fields in your report.
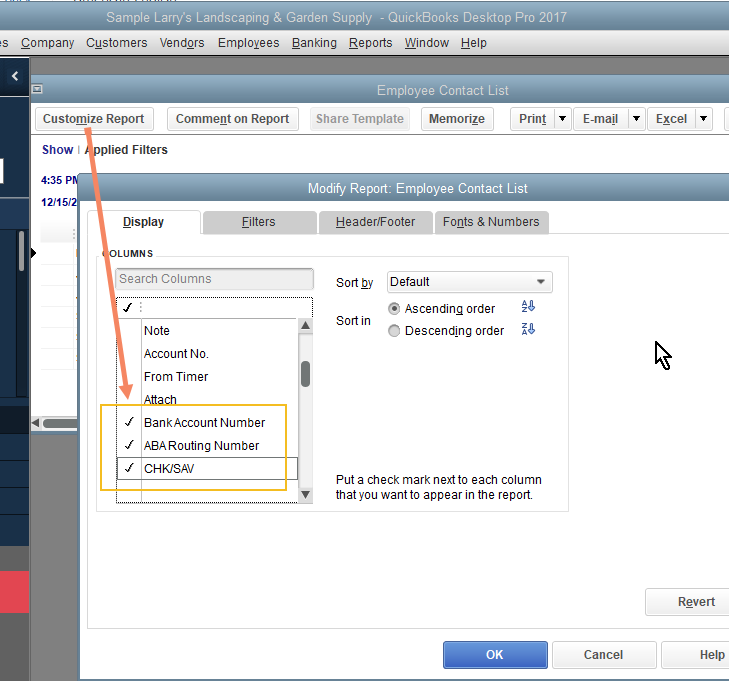
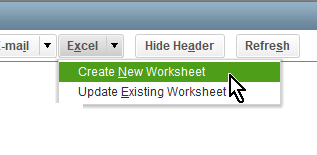
Click 'OK' and run the report. Then, click the Excel button to flip the report into Excel, and 'Create New Worksheet'.
For low volume files, you can
Add a column for 'Amount' on the Excel sheet that was created. Fill in the amounts from the net payments showing in an exported bank register, or manually type in the amounts.

After amounts are entered, save the file, and then import it to Treasury Software. Follow these instructions:
https://treasurysoftware.zendesk.com/knowledge/articles/360010115994/en-us?brand_id=360000785393
For high volume files,
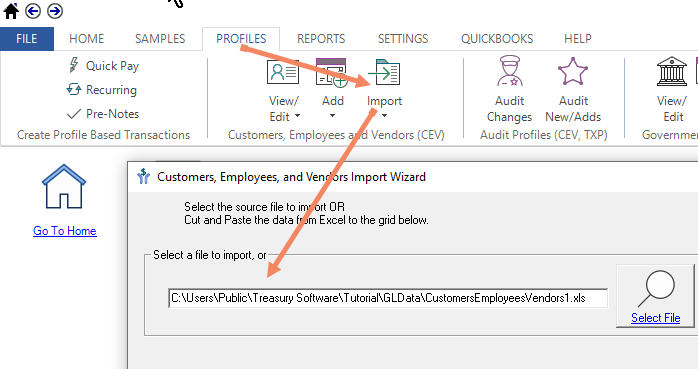
1. Without adding any columns (no 'Amount' column), you'll import the Excel file under the 'Profiles' tab in Treasury Software. Click on 'Import', select the Excel file that was created from QuickBooks and go through the import process, mapping the column headers to identify the data in each column. Continue through the import process until Finished. This will store all ACH recipients' bank information in the software.
Ref: https://help.treasurysoftware.com/hc/en-us/articles/360010353973-Creating-and-Using-Profiles
2. Then, a second import (Excel) file will be created using an export of the Check Register in QuickBooks.
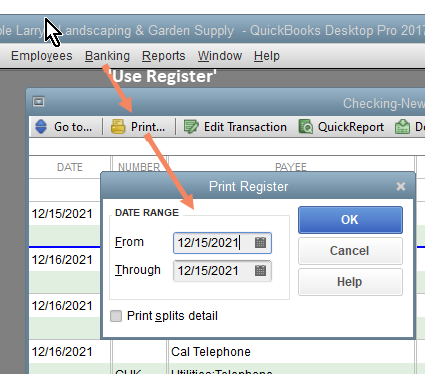
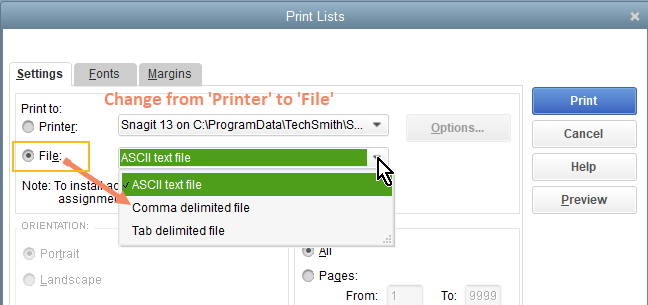
The Check Register file is subsequently imported to ACH Universal, and you will only need two columns mapped when importing--the 'ACH_Name_Internal(Profile Lookup)' and the 'Amount' (or Amount Reverse Sign).
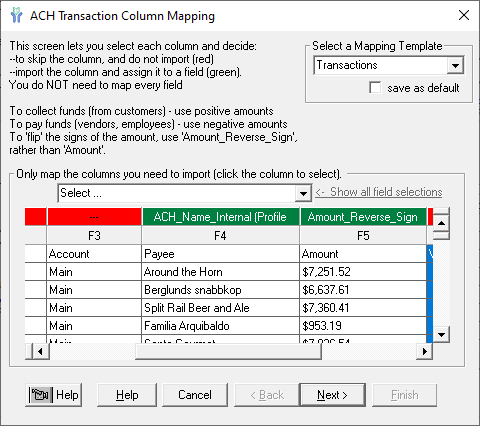
The Lookup field will connect to the banking information that has been stored.
Ref: https://help.treasurysoftware.com/hc/en-us/articles/360010241134-Mapping-Import-Data-Using-Profiles
Once your QuickBooks data is imported, you'll follow these instructions to create the ACH file:


