In-house testing?
If you are simply performing in-house testing (such as IT testing), you can skip this step, as you can create ACH files without entering this information--however, your file should not be given to the bank or processor as it will be rejected without the ACH Setup (header) information on the top two lines of the file.
Testing with your bank?
If you will be testing with your bank, you will need to complete the ACH Setup prior to creating the files that you send to them.
NOTE: If you are a Canadian user, click the link under the red maple leaf icon below. You will not complete this Setup Wizard but will instead complete the Canadian Setup.
Access the ACH Setup Wizard by clicking either the ACH Setup icon on the ACH Universal home page (below), or on the ACH Setup icon in the top toolbar. The ACH Setup Wizard will be displayed. Click Next.
ACH File Header Record - Screen 2
Enter the 'file header' info (see below).
This identifies the bank account that is paying or receiving funds and includes your bank information.
1. If you received this information from your bank, enter it exactly as noted.
2. Otherwise, if you have already created ACH files using Notepad or another software process, and you have access to this file, ACH Universal can import the settings from that ACH file. Simply click on the link 'Populate header entries from an existing ACH file'.
3. Or, you will enter this manually. Follow the text in the Wizard.
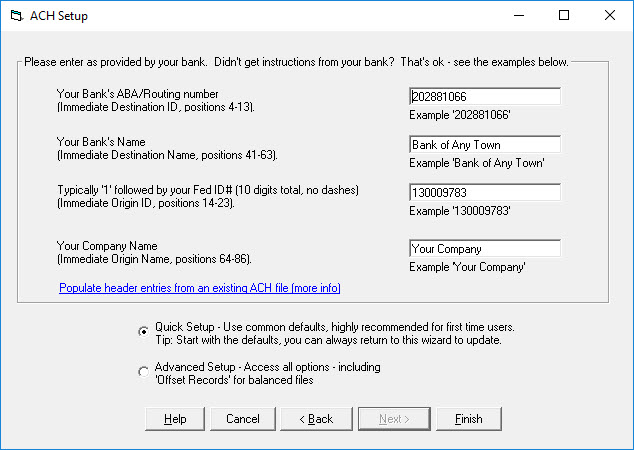
To get to the next page, you must click the 'Advanced Setup' radio button, and then you can click 'Next'.
Batch Header Records - Screen 3
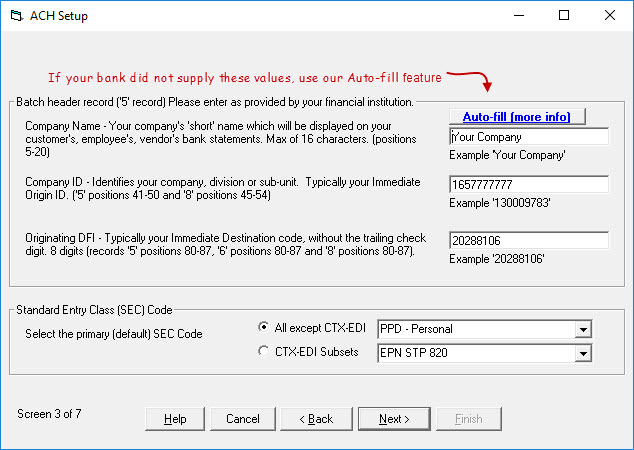
Enter the 'batch header' info
This is often a subset of the file header.
1. If you received this information from your bank, enter it exactly as noted.
2. Otherwise, if you clicked on the link 'Populate header entries from an existing ACH file', do not modify your entries. Your entries have been populated.
3. Or, if you entered the prior screen manually, click on the 'Auto-fill' link. This will populate your entries based on your earlier entries.
Leave the Standard Entry Class as defaulted (PPD), unless noted otherwise.
Which Standard Entry Class (SEC) code do I use?
If you have a standing authorization in writing to perform collections/payments, and the other party is located in the U.S., you may be eligible to use:
PPD - Personal/Consumer Accounts (Prearranged Payment and Deposit)
CCD - Corporate/Non-consumer Accounts (Corporate Debit or Credit)
A good example is payroll to domestic employees, when you should use PPD.
Please consult your banker before starting to insure that you are using the correct code.
Other formats that ACH Universal supports are available at SEC Codes .
Note: If you are using ACH Universal's Multiple Origination account feature in the Advanced (Processor) edition, this advanced feature will override some of the values entered in the ACH Setup.
Offset Record and completion of Basic setup - Screen 4
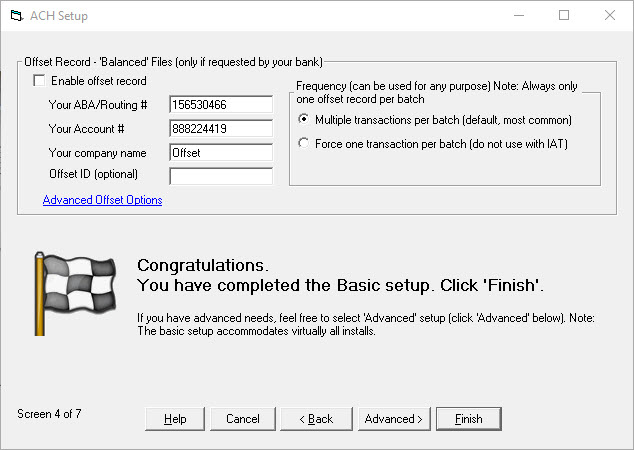
Offset Record (or 'Balanced File')
Only use an offset record if your bank notifies you that it is required. Typically, smaller banks and credit unions will require an offset record or 'balanced file'.
If your bank does require an offset record, click this check-box on Screen 4.
- Enter the ABA or Routing Number for your organization's bank.
- Enter your organization's bank account number.
For the vast majority of users, you can click 'Finish' to complete the wizard. This will save your work.
If you have advanced needs, or are curious as to the additional settings, click 'Advanced'.
Preferences - Screen 5
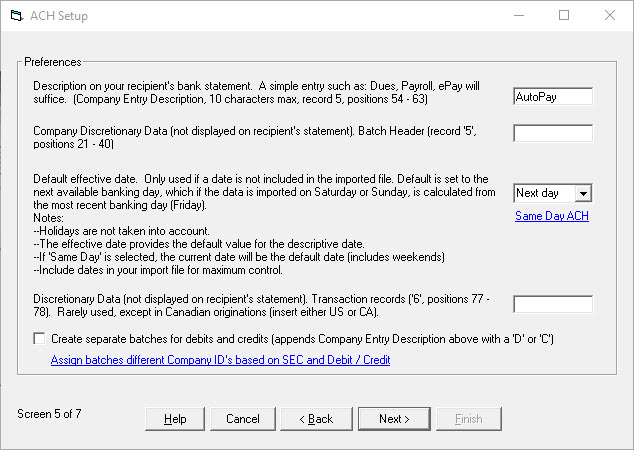
Description on your recipient's bank statement - In the text field, enter the description of the transaction that will show on customer, employee, and/or vendor bank statements. For example, you might enter "Payroll" for a direct deposit payment to an employee. This entry is located in the ACH file in the Batch Header (5 record, positions 54 - 63).
Company Discretionary Data - Typically not entered unless requested by your processor or bank. This entry is located in the ACH file in the Batch Header (5 record, positions 21- 40).
Default effective date - Select when you want the bank to process the transactions. For example, some banks want to receive an ACH file two days prior to processing. In that case, change the dropdown to 'Two Days', and continue through the wizard until 'Finished'.
Notes:
--This setting only effects transactions when a date is not entered on your import file. If you import a 'Date' field with your transactions, it will override this setting.
--For maximum control, import a 'Date' with your transactions.
--This setting takes into account Saturdays and Sundays, but not holidays.
--The bank's rules determine the exact date of processing. Contact your bank for their exact policies.
When finished, click Next.
Third-party processors and preferences - Screen 6
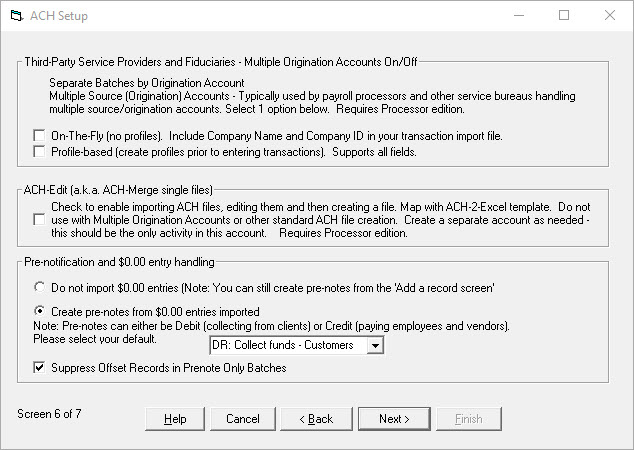
Multiple Origination account and third-party NACHA compliance
If using a Multiple Origination account, turn 'On' the feature here. Remember, when you turn it on, you will need to map an 'Origination Account' field during the import process.
Note: The Multiple Origination feature requires the Advanced (Processor) edition license.
Profile Lookup
ACH Universal supports the use of Profiles for creating payments or collection transactions. Profiles are not required by ACH Universal, however, it is capable of ad hoc payments or collections.
When using Profiles, the 'lookup field' on the transaction import can be either the Name or ID Number.
Profile Lookup - This setting only comes into play during the import process.
Checking or Savings Accounts
If your file contains a field that differentiates an account between a checking and savings account, enter the appropriate checking account text into the text field. ACH Universal will interpret all other text as indicating a savings account.
Consumer or Corporate Accounts
Similar to Checking or Savings Account text above, use text in this field to identify a consumer account. All other text in that field will cause ACH Universal to treat the record as a 'corporate' (or business) account.
Pre-notifications
Pre-notifications are used to test a transmission to ensure all settings are correct before transmitting live data. A pre-note is indicated in your data by a zero amount. In the dropdown box, select the transaction type you wish to test (DR->collecting funds or CR->paying funds).
When finished, click Next.
Profile and Advanced settings - Screen 7
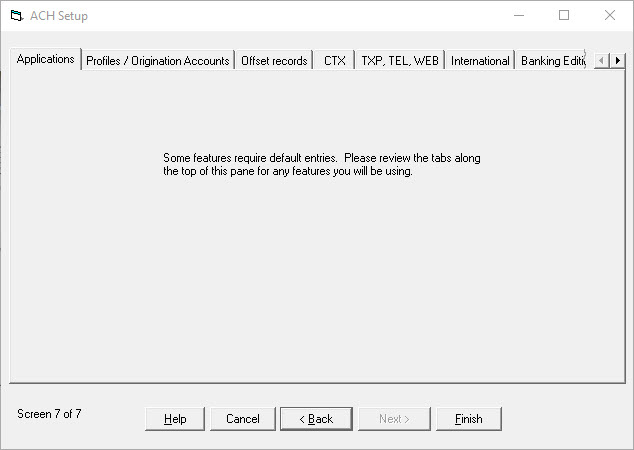
The next screen is the last screen in the process. In most cases, you can simply click Finish.
You have finished creating and setting up an ACH Universal account. You can now begin importing data into the account and transmitting ACH files.


