This section is devoted to accounting software developers and other third party developers (including end-users) who are looking to integrate Treasury Software applications into a seamless and automated process for their users.
Our Software Integration Kit (SIK), unlike most automation development kits, is included directly in the runtime edition - and is available to both power users and software developers in a Graphical User Interface.
Treasury Software's SIK includes full automation tools to seamlessly:
--import any file
--import all files within a directory
--archive (move) the imported files
--preserve the audit trail of archived files (append the file name of each file with a date/time stamp to insure that each file is uniquely named in the archive directory)
--provide summary reporting
and, of course
--perform any Treasury Software core module process including:
----ACH and Positive Pay file creation
----ACH and Positive Pay file transmission
----Automated Transaction Matching (ATM) for bank reconciliation
Note: The Software Integration Kit is referenced as the 'Custom Import Menu Setup' in some documents - and will be used here interchangeably.
Select the Automation tab then Software Integration Kit.

You can have up to 20 integration routines per account. Select one that is not being used and click 'Add/Edit'.

Settings pages - Basic, Advanced and Automation

Visible - Check this box if you want this process to be available to the user from the main menu (Import submenu). This checkbox only drives visibility - it does not activate or inactivate a process.
What do you want to import?
File - select the file
Folder - point to a folder. Note: Each of the files should have the same format.
SQL Integration - 'Data has been placed into a SQL table by another process (see SQL Integration)
Tip:
If you only want to import one file, but the file name is dynamic (keeps changing), then use the folder option.
Mapping Templates
Each custom process has it's own custom import layout. For example, here in the 1st process, the system defaults to the Custom Menu #1 template in the drop down list. The 2nd custom process will have a Custom Menu #2, and so on.
This enables each custom process to have its own file layout.
Bank Reconciliation only
There will be two Custom Menu layout drop down lists. One is for the G/L (on the left), the other is for the Bank data (on the right). If automating both bank and G/L imports - create a separate process for each (and keep each set of files in a different folder if using the folder import).
Fixed Width formats
If a fixed width files is to be imported, the file needs to be parsed. In a similar manner, a second row of drop down lists will be displayed - these are for fixed width files only. To display the second row of drop down lists, click on 'Unsupported file formats' hyperlink on the second page.

Advanced - Second Page

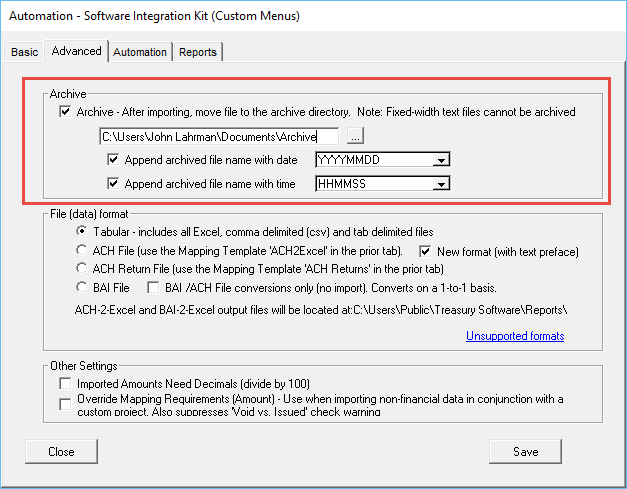
Archive
This is used to preserve the audit trail and keep the original import file available for future research and review.
The file is moved to the archive directory after a successful import. We recommend appending the file name with a date/time stamp, as this will make the file name unique, and insure that when the file is copied into the archive directory it will not over-write any existing files.
Note: Fixed width text files are not supported in the archive process.
Tip: Confirm that the user triggering the custom process will have rights/privileges to the archive directory - as it will be performed under their security profile.
File format
Notes:
Tabular - includes Excel, comma delimited (csv) and tab delimited files.
Fixed width file notes:
Select tabular - and also click the hyperlink 'Unsupported file formats' to display the second row of mapping templates.
Automation - Third Page

Command Line Group
This enables the process to be triggered from the Command Line Interface.
Processes are triggered by the numeric value set here. Therefore, all twenty processes could be called from a single command line - assuming all has the same value.
The basic syntax for the trigger is:
[path]\BRCOM.exe /ACCT="sample" /MENU /AUTO=1
· Account (database) - /ACCT
· Include to activate (static to trigger) - /MENU
· Group to use (numeric value in the Command Line Group number box)- /AUTO
This example triggers the Custom Import Menu group #1 (AUTO=1) for the 'sample' account.
Chaining multiple processes
Select a numeric value in the Command Line Group number box. When passed to the program, it will trigger sequentially all custom menu selections with the same value.
Example:
You want to trigger three import processes and then create and transmit an Positive Pay file.
Import process 1 - Import a single payroll file
Import process 2 - Import all trade payable files in a directory
Import process 3 - Import all customer collection files in a directory
Create three separate custom menus, with all having the same Command Line Group number (1). As the processes are sequenced based on the process order (from the list top to bottom), make sure they are in sequence, as the last one will contain the automation process.
On Import process 3 (only), select the 'Custom Action After Import' to 'Positive Pay File - Create and Transmit'.
Custom Action after import
This can be:
ACH File - Create and Transmit
Positive Pay File - Create and Transmit
Automated Transaction Matching
Select as needed.
Custom Date Formats
Enables you to import non-standard date formats.
Question - How do you know if the format is a custom format?
Try opening the source file in Excel. If Excel opens the file and the date looks appropriate, you do not need to enter any settings. However, if Excel has a a problem interpreting the date - so will Treasury Software.


